
Install Oracle RAC 19c on Linux
This post describes the mostly unattended installation of a 2 node Oracle Real Application Cluster 19c on Oracle Linux 9.5.
Table of Contents
Oracle RAC is one Oracle Database that has multiple instances (nodes) that can work in parallel on the data in the database. For this setup we need two Oracle Linux 9.5 nodes. The installation is described here. The following files are needed for the installation of Oracle RAC 19c RU 19.27 (they will be stored in a directory accessible from within the VM):
- p37904590_1927000GIRU_Linux-x86-64.zip (CANNED GOLDIMAGE FOR ORACLE DATABASE 19.27.0.0.0 GIRU)
- p37757478_1927000DBRU_Linux-x86-64.zip (DATABASE SOFTWARE CLONE 19.27.0.0.250415 APR 2025)
For the RAC cluster we need 2 resolveable VIP IP addresses (<node1>-vip.fritz.box/<node2>-vip.fritz.box in my case) and one scan ip address (lin-cluster-scan.fritz.box in my case). The scan name should resolve to 3 ip addresses in a round robin fashion, although it is not mandatory. To be able to communicate between the two nodes and to have access to the database files we need to have shared disks and a private network for inter node network communication. This will be setup in the following step:
Preparation
rem run this in a cmd prompt on the Windows host of the VMs
set "NODE1="
set "NODE2="
(set /p NODE1=Enter VM name of cluster node 1 ^(e.g. lin1^):
set /p NODE2=Enter VM name of cluster node 2 ^(e.g. lin2^):
rem add and attach 3 75GB disks for diskgroup +DATA
call vboxmanage createmedium disk --filename c:\vms\%NODE1%\%NODE1%_rac_1.vdi --sizebyte=80530636800 --variant Fixed
call vboxmanage createmedium disk --filename c:\vms\%NODE1%\%NODE1%_rac_2.vdi --sizebyte=80530636800 --variant Fixed
call vboxmanage createmedium disk --filename c:\vms\%NODE1%\%NODE1%_rac_3.vdi --sizebyte=80530636800 --variant Fixed
call vboxmanage storageattach %NODE1% --storagectl "SATA" --port 1 --device 0 --type hdd --medium c:\vms\%NODE1%\%NODE1%_rac_1.vdi --mtype=shareable
call vboxmanage storageattach %NODE2% --storagectl "SATA" --port 1 --device 0 --type hdd --medium c:\vms\%NODE1%\%NODE1%_rac_1.vdi --mtype=shareable
call vboxmanage storageattach %NODE1% --storagectl "SATA" --port 2 --device 0 --type hdd --medium c:\vms\%NODE1%\%NODE1%_rac_2.vdi --mtype=shareable
call vboxmanage storageattach %NODE2% --storagectl "SATA" --port 2 --device 0 --type hdd --medium c:\vms\%NODE1%\%NODE1%_rac_2.vdi --mtype=shareable
call vboxmanage storageattach %NODE1% --storagectl "SATA" --port 3 --device 0 --type hdd --medium c:\vms\%NODE1%\%NODE1%_rac_3.vdi --mtype=shareable
call vboxmanage storageattach %NODE2% --storagectl "SATA" --port 3 --device 0 --type hdd --medium c:\vms\%NODE1%\%NODE1%_rac_3.vdi --mtype=shareable
rem add and attach 3 14GB disks for diskgroup +FRA
call vboxmanage createmedium disk --filename c:\vms\%NODE1%\%NODE1%_rac_4.vdi --sizebyte=15032385536 --variant Fixed
call vboxmanage createmedium disk --filename c:\vms\%NODE1%\%NODE1%_rac_5.vdi --sizebyte=15032385536 --variant Fixed
call vboxmanage createmedium disk --filename c:\vms\%NODE1%\%NODE1%_rac_6.vdi --sizebyte=15032385536 --variant Fixed
call vboxmanage storageattach %NODE1% --storagectl "SATA" --port 4 --device 0 --type hdd --medium c:\vms\%NODE1%\%NODE1%_rac_4.vdi --mtype=shareable
call vboxmanage storageattach %NODE2% --storagectl "SATA" --port 4 --device 0 --type hdd --medium c:\vms\%NODE1%\%NODE1%_rac_4.vdi --mtype=shareable
call vboxmanage storageattach %NODE1% --storagectl "SATA" --port 5 --device 0 --type hdd --medium c:\vms\%NODE1%\%NODE1%_rac_5.vdi --mtype=shareable
call vboxmanage storageattach %NODE2% --storagectl "SATA" --port 5 --device 0 --type hdd --medium c:\vms\%NODE1%\%NODE1%_rac_5.vdi --mtype=shareable
call vboxmanage storageattach %NODE1% --storagectl "SATA" --port 6 --device 0 --type hdd --medium c:\vms\%NODE1%\%NODE1%_rac_6.vdi --mtype=shareable
call vboxmanage storageattach %NODE2% --storagectl "SATA" --port 6 --device 0 --type hdd --medium c:\vms\%NODE1%\%NODE1%_rac_6.vdi --mtype=shareable
timeout /T 5 /NOBREAK
call vboxmanage controlvm %NODE1% shutdown
call vboxmanage controlvm %NODE2% shutdown
timeout /T 10 /NOBREAK
rem increase main memory
call vboxmanage modifyvm %NODE1% --memory=12288
call vboxmanage modifyvm %NODE2% --memory=12288
rem add interconnect network adapters
call vboxmanage modifyvm %NODE1% --nic2=intnet --nic-type2=82540EM --cable-connected2=on --intnet2=interconnect
call vboxmanage modifyvm %NODE2% --nic2=intnet --nic-type2=82540EM --cable-connected2=on --intnet2=interconnect
call vboxmanage startvm %NODE1%
call vboxmanage startvm %NODE2%)
Now we create the users oracle and grid on the linux VMs, set some recommended kernel parameters and add swap space (run as root on both VMs):
bash -c "# add groups and users
groupadd -g 2000 oinstall ; groupadd -g 2001 dba ; groupadd -g 2002 asmdba ; groupadd -g 2003 asmadmin
useradd -u 2000 -g 2000 -G disk,dba,asmdba,vboxsf oracle && echo 'oracle:changeme'|chpasswd
useradd -u 2001 -g 2000 -G disk,dba,asmdba,asmadmin,vboxsf grid && echo 'grid:changeme'|chpasswd
# create ssh keys
echo ''|ssh-keygen -q -t rsa -b 3072 -m PEM -N ''
su - oracle -c \"echo ''|ssh-keygen -q -t rsa -b 3072 -m PEM -N ''\"
su - grid -c \"echo ''|ssh-keygen -q -t rsa -b 3072 -m PEM -N ''\"
# create environment files
echo 'export ORACLE_HOME=/u01/app/19.0.0/grid' > ~grid/grid.env
echo 'export PATH=\$ORACLE_HOME/bin:\$ORACLE_HOME/jdk/bin:\$ORACLE_HOME/OPatch:\$PATH' >> ~grid/grid.env
chown grid:oinstall ~grid/grid.env
echo 'source ~/grid.env' >> ~grid/.bash_profile
echo 'export ORACLE_HOME=/u01/app/oracle/product/19.0.0/dbhome_1' > ~oracle/ora19.env
echo 'export PATH=\$ORACLE_HOME/bin:\$ORACLE_HOME/jdk/bin:\$ORACLE_HOME/OPatch:\$PATH' >> ~oracle/ora19.env
chown oracle:oinstall ~oracle/ora19.env
echo 'source ~/ora19.env' >> ~oracle/.bash_profile
# create directories
mkdir -p /u01 && chmod 775 /u01 && chown grid:oinstall /u01
mkdir -p /u01/app/19.0.0/grid # GRID_HOME
mkdir -p /u01/app/grid # GRID_BASE
mkdir -p /u01/app/oracle/product/19.0.0/dbhome_1 # ORACLE_HOME
chown grid:oinstall /u01/app && chown -R grid:oinstall /u01/app/19.0.0 && chown grid:oinstall /u01/app/grid
chown -R oracle:oinstall /u01/app/oracle # ORACLE_BASE
chmod 775 /u01/app && chmod -R 775 /u01/app/19.0.0 && chmod 775 /u01/app/grid
chmod -R 775 /u01/app/oracle
# install required OS packages
dnf -y install bc binutils compat-openssl11 elfutils-libelf fontconfig glibc glibc-devel ksh libaio libasan liblsan libX11 libXau libXi libXrender libXtst libxcrypt-compat libgcc libibverbs libnsl librdmacm libstdc++ libxcb libvirt-libs make policycoreutils policycoreutils-python-utils smartmontools sysstat
# adjust parameters
echo 'fs.aio-max-nr = 1048576
fs.file-max = 6815744
kernel.shmall = 2097152
kernel.shmmax = 6442450944
kernel.shmmni = 4096
kernel.sem = 250 32000 100 128
kernel.panic = 1
net.ipv4.ip_local_port_range = 9000 65500
net.core.rmem_default = 262144
net.core.rmem_max = 4194304
net.core.wmem_default = 262144
net.core.wmem_max = 1048576' > /etc/sysctl.d/97-oracle-database-sysctl.conf
/sbin/sysctl --system
echo '* soft stack 10240
* soft memlock 12582912
* hard memlock 12582912' >> /etc/security/limits.conf
systemctl stop avahi-daemon.socket
systemctl disable avahi-daemon.socket
systemctl stop avahi-daemon.service
systemctl disable avahi-daemon.service
dnf config-manager --enable ol9_addons
dnf -y install oracleasm-support /sw/oracleasmlib-3.1.0-6.el9.x86_64.rpm
oracleasm configure -u grid -g asmadmin -e -s y -f y
systemctl restart oracleasm
# add swap space
dd if=/dev/zero of=/swapfile bs=1024 count=4194304 # create a 4 GB swapfile
chmod 0600 /swapfile && mkswap /swapfile && swapon /swapfile
echo '/swapfile       swap       swap       defaults       0 0' >> /etc/fstab
swapon"
Grid Infrastructure (GI) Installation
Now we need to enable passwordless login, setup the interconnect, unpack the grid software, configure the ASM disks and start the RAC installation (run as root on the first node). This will take about 1h:
# configure passwordless ssh login
(pnode=`hostname|awk -F. {'print $1'}`
echo -n 'Enter the hostname of the second RAC node (e.g. lin2): ' && read snode
# for root
ssh-keyscan -t ecdsa $snode >> ~/.ssh/known_hosts
sshpass -p changeme ssh-copy-id $snode
ssh $snode 'ssh-keyscan -t ecdsa '$pnode' >> ~/.ssh/known_hosts'
ssh $snode sshpass -p changeme ssh-copy-id $pnode
# for oracle
su - oracle -c 'ssh-keyscan -t ecdsa '$snode' >> ~oracle/.ssh/known_hosts'
su - oracle -c 'sshpass -p changeme ssh-copy-id '$snode
su - oracle -c "ssh "$snode" 'ssh-keyscan -t ecdsa '$pnode' >> ~oracle/.ssh/known_hosts'"
su - oracle -c 'ssh '$snode' sshpass -p changeme ssh-copy-id '$pnode
# for grid
su - grid -c 'ssh-keyscan -t ecdsa '$snode' >> ~grid/.ssh/known_hosts'
su - grid -c 'sshpass -p changeme ssh-copy-id '$snode
su - grid -c "ssh "$snode" 'ssh-keyscan -t ecdsa '$pnode' >> ~grid/.ssh/known_hosts'"
su - grid -c 'ssh '$snode' sshpass -p changeme ssh-copy-id '$pnode
# adjust grid env file
echo 'export ORACLE_SID=+ASM1' >> ~grid/grid.env
ssh $snode "echo 'export ORACLE_SID=+ASM2' >> ~grid/grid.env"
echo 'export ORACLE_SID=orcl1' >> ~oracle/ora19.env
ssh $snode "echo 'export ORACLE_SID=orcl2' >> ~oracle/ora19.env"
# setup interconnect network
nmcli con add type ethernet ifname enp0s8 con-name 'RAC Interconnect' ip4 192.168.5.1/24
ssh $snode "nmcli con add type ethernet ifname enp0s8 con-name 'RAC Interconnect' ip4 192.168.5.2/24"
# unpack the GI software
echo 'Unpacking Grid Infrastructure sw. Please wait...'
if [ `ls /u01/app/19.0.0/grid|wc -l` -eq 0 ] ; then
 su - grid -c 'cd /u01/app/19.0.0/grid; cp /sw/oracle/gi/19c_linux/p37904590_1927000GIRU_Linux-x86-64.zip .; unzip -q ./p37904590_1927000GIRU_Linux-x86-64.zip grid_home.zip; unzip -q grid_home.zip; chown -R grid:oinstall *; rm -f ./p37904590_1927000GIRU_Linux-x86-64.zip grid_home.zip'
fi
# unpack the DB software
echo 'Unpacking Database sw. Please wait...'
if [ `ls /u01/app/oracle/product/19.0.0/dbhome_1|wc -l` -eq 0 ] ; then
 su - oracle -c 'cd /u01/app/oracle/product/19.0.0/dbhome_1; cp /sw/oracle/db/19c_linux/p37757478_1927000DBRU_Linux-x86-64.zip .; unzip -q ./p37757478_1927000DBRU_Linux-x86-64.zip db-klone-Linux-x86-64-19000250415.zip; unzip -q db-klone-Linux-x86-64-19000250415.zip; chown -R oracle:oinstall *; rm -f p37757478_1927000DBRU_Linux-x86-64.zip db-klone-Linux-x86-64-19000250415.zip'
fi
# install cvuqdisk
scp /u01/app/19.0.0/grid/cv/rpm/cvuqdisk-1.0.10-1.rpm $snode:/tmp
if ! ssh $snode rpm -q cvuqdisk; then ssh $snode rpm -i /tmp/cvuqdisk-1.0.10-1.rpm; fi
if ! rpm -q cvuqdisk; then rpm -i /u01/app/19.0.0/grid/cv/rpm/cvuqdisk-1.0.10-1.rpm; fi
# configure ASM disks
for i in b c d e f g ; do echo 'n
p
1


w
q'|fdisk /dev/sd$i; done
# create Oracle ASM disks
j=1; for i in `fdisk -l|grep '75 GiB'|awk {'print $2'}|sed s/:$//`; do oracleasm createdisk DATA$j $i'1'; let j=j+1; done
j=1; for i in `fdisk -l|grep '14 GiB'|awk {'print $2'}|sed s/:$//`; do oracleasm createdisk FRA$j $i'1'; let j=j+1; done
sleep 5
ssh $snode partprobe
# install RAC cluster
cat > ~grid/rsp_grid.rsp << EOF
oracle.install.responseFileVersion=/oracle/install/rspfmt_crsinstall_response_schema_v19.0.0
INVENTORY_LOCATION=/u01/app/oraInventory
oracle.install.option=CRS_CONFIG
ORACLE_BASE=/u01/app/grid
oracle.install.asm.OSDBA=asmdba
oracle.install.asm.OSASM=asmadmin
oracle.install.crs.config.scanType=LOCAL_SCAN
oracle.install.crs.config.gpnp.scanName=lin-cluster-scan
oracle.install.crs.config.gpnp.scanPort=1521
oracle.install.crs.config.ClusterConfiguration=STANDALONE
oracle.install.crs.config.configureAsExtendedCluster=false
oracle.install.crs.config.clusterName=lin-cluster
oracle.install.crs.config.gpnp.configureGNS=false
oracle.install.crs.config.autoConfigureClusterNodeVIP=false
oracle.install.crs.config.clusterNodes=$pnode.fritz.box:$pnode-vip.fritz.box,$snode.fritz.box:$snode-vip.fritz.box
oracle.install.crs.config.networkInterfaceList=enp0s3:11.1.1.0:1,enp0s8:192.168.5.0:5
oracle.install.crs.configureGIMR=true
oracle.install.asm.configureGIMRDataDG=false
oracle.install.crs.config.storageOption=FLEX_ASM_STORAGE
oracle.install.crs.config.sharedFileSystemStorage.ocrLocations=
oracle.install.crs.config.useIPMI=false
oracle.install.asm.diskGroup.name=DATA
oracle.install.asm.diskGroup.redundancy=NORMAL
oracle.install.asm.diskGroup.AUSize=4
oracle.install.asm.diskGroup.disksWithFailureGroupNames=ORCL:DATA3,,ORCL:DATA2,,ORCL:DATA1,
oracle.install.asm.diskGroup.disks=ORCL:DATA3,ORCL:DATA2,ORCL:DATA1
oracle.install.asm.diskGroup.diskDiscoveryString=ORCL:*
oracle.install.asm.gimrDG.AUSize=1
oracle.install.asm.configureAFD=false
oracle.install.crs.configureRHPS=false
oracle.install.crs.config.ignoreDownNodes=false
oracle.install.config.managementOption=NONE
oracle.install.config.omsPort=0
oracle.install.crs.rootconfig.executeRootScript=true
oracle.install.crs.rootconfig.configMethod=ROOT
oracle.install.asm.monitorPassword=changeme
oracle.install.asm.SYSASMPassword=changeme
EOF
chown grid:oinstall ~grid/rsp_grid.rsp
su - grid -c "echo changeme|/u01/app/19.0.0/grid/gridSetup.sh -silent -responseFile /home/grid/rsp_grid.rsp")
We can now check if the GI services are running:
su - grid -c "crsctl stat res -t"
--------------------------------------------------------------------------------
Name           Target  State        Server                   State details
--------------------------------------------------------------------------------
Local Resources
--------------------------------------------------------------------------------
ora.LISTENER.lsnr
               ONLINE  ONLINE       lin3                     STABLE
               ONLINE  ONLINE       lin4                     STABLE
ora.chad
               ONLINE  ONLINE       lin3                     STABLE
               ONLINE  ONLINE       lin4                     STABLE
ora.helper
               OFFLINE OFFLINE      lin3                     IDLE,STABLE
               OFFLINE OFFLINE      lin4                     IDLE,STABLE
ora.net1.network
               ONLINE  ONLINE       lin3                     STABLE
               ONLINE  ONLINE       lin4                     STABLE
ora.ons
               ONLINE  ONLINE       lin3                     STABLE
               ONLINE  ONLINE       lin4                     STABLE
ora.proxy_advm
               OFFLINE OFFLINE      lin3                     STABLE
               OFFLINE OFFLINE      lin4                     STABLE
--------------------------------------------------------------------------------
Cluster Resources
--------------------------------------------------------------------------------
ora.ASMNET1LSNR_ASM.lsnr(ora.asmgroup)
      1        ONLINE  ONLINE       lin3                     STABLE
      2        ONLINE  ONLINE       lin4                     STABLE
ora.DATA.dg(ora.asmgroup)
      1        ONLINE  ONLINE       lin3                     STABLE
      2        ONLINE  ONLINE       lin4                     STABLE
ora.LISTENER_SCAN1.lsnr
      1        ONLINE  ONLINE       lin3                     STABLE
ora.MGMTLSNR
      1        ONLINE  ONLINE       lin3                     169.254.8.28 192.168
                                                             .5.1,STABLE
ora.asm(ora.asmgroup)
      1        ONLINE  ONLINE       lin3                     Started,STABLE
      2        ONLINE  ONLINE       lin4                     Started,STABLE
ora.asmnet1.asmnetwork(ora.asmgroup)
      1        ONLINE  ONLINE       lin3                     STABLE
      2        ONLINE  ONLINE       lin4                     STABLE
ora.cvu
      1        ONLINE  ONLINE       lin3                     STABLE
ora.lin3.vip
      1        ONLINE  ONLINE       lin3                     STABLE
ora.lin4.vip
      1        ONLINE  ONLINE       lin4                     STABLE
ora.mgmtdb
      1        ONLINE  ONLINE       lin3                     Open,STABLE
ora.qosmserver
      1        ONLINE  ONLINE       lin3                     STABLE
ora.rhpserver
      1        OFFLINE OFFLINE                               STABLE
ora.scan1.vip
      1        ONLINE  ONLINE       lin3                     STABLE
--------------------------------------------------------------------------------
Next we create a Fast Recovery Area (FRA) diskgroup:
# run on the first node
su - grid -c "
sqlplus / as sysasm << EOF
create diskgroup fra normal redundancy
disk 'ORCL:FRA1'
disk 'ORCL:FRA2'
disk 'ORCL:FRA3';
EOF
srvctl start diskgroup -g fra"
RAC Database Installation
The following will perform a silent installation of the database software. If you prefer the GUI installation take a look here (run as root on the first node):
pnode=`su - grid -c 'olsnodes|head -1'`
snode=`su - grid -c 'olsnodes|tail -1'`
cat > ~oracle/rsp_db.rsp << EOF
oracle.install.responseFileVersion=/oracle/install/rspfmt_dbinstall_response_schema_v19.0.0
oracle.install.option=INSTALL_DB_SWONLY
UNIX_GROUP_NAME=oinstall
INVENTORY_LOCATION=/u01/app/oraInventory
ORACLE_BASE=/u01/app/oracle
oracle.install.db.InstallEdition=EE
oracle.install.db.OSDBA_GROUP=dba
oracle.install.db.OSBACKUPDBA_GROUP=dba
oracle.install.db.OSDGDBA_GROUP=dba
oracle.install.db.OSKMDBA_GROUP=dba
oracle.install.db.OSRACDBA_GROUP=dba
oracle.install.db.rootconfig.executeRootScript=true
oracle.install.db.rootconfig.configMethod=ROOT
oracle.install.db.CLUSTER_NODES=$pnode,$snode
oracle.install.db.config.starterdb.type=GENERAL_PURPOSE
oracle.install.db.ConfigureAsContainerDB=false
oracle.install.db.config.starterdb.memoryOption=false
oracle.install.db.config.starterdb.installExampleSchemas=false
oracle.install.db.config.starterdb.managementOption=DEFAULT
oracle.install.db.config.starterdb.omsPort=0
oracle.install.db.config.starterdb.enableRecovery=false
EOF
chown oracle:oinstall ~oracle/rsp_db.rsp
su - oracle -c "echo changeme|/u01/app/oracle/product/19.0.0/dbhome_1/runInstaller -silent -responseFile /home/oracle/rsp_db.rsp"
Now we create the orcl database (as root on node1):
newsid=orcl
pnode=`su - grid -c 'olsnodes|head -1'`
snode=`su - grid -c 'olsnodes|tail -1'`
su - oracle -c "dbca -silent -createDatabase -gdbName $newsid.fritz.box -templateName General_Purpose.dbc            \
 -runCVUChecks true -systemPassword changeme -sysPassword changeme -createAsContainerDatabase true                \
 -pdbName pdb1 -pdbAdminPassword changeme  -storageType ASM -datafileDestination +DATA -databaseConfigType RAC    \
 -nodelist $pnode,$snode -recoveryAreaDestination +FRA -recoveryAreaSize 14000 -memoryPercentage 40               \
 -databaseType MULTIPURPOSE -emConfiguration DBEXPRESS -dbsnmpPassword changeme -emExpressPortAsGlobalPort true"
# to be able to login to the EM Express we need to perform the following
chmod 640 /u01/app/oracle/product/19.0.0/dbhome_1/admin/$newsid/xdb_wallet/cwallet.sso
chmod 640 /u01/app/oracle/product/19.0.0/dbhome_1/admin/$newsid/xdb_wallet/ewallet.p12
ssh $snode 'chmod 640 /u01/app/oracle/product/19.0.0/dbhome_1/admin/'$newsid'/xdb_wallet/cwallet.sso' &&
ssh $snode 'chmod 640 /u01/app/oracle/product/19.0.0/dbhome_1/admin/'$newsid'/xdb_wallet/ewallet.p12'
The database is now ready to use and we can login with:
# type exit to logout
su - oracle -c "sqlplus / as sysdba"
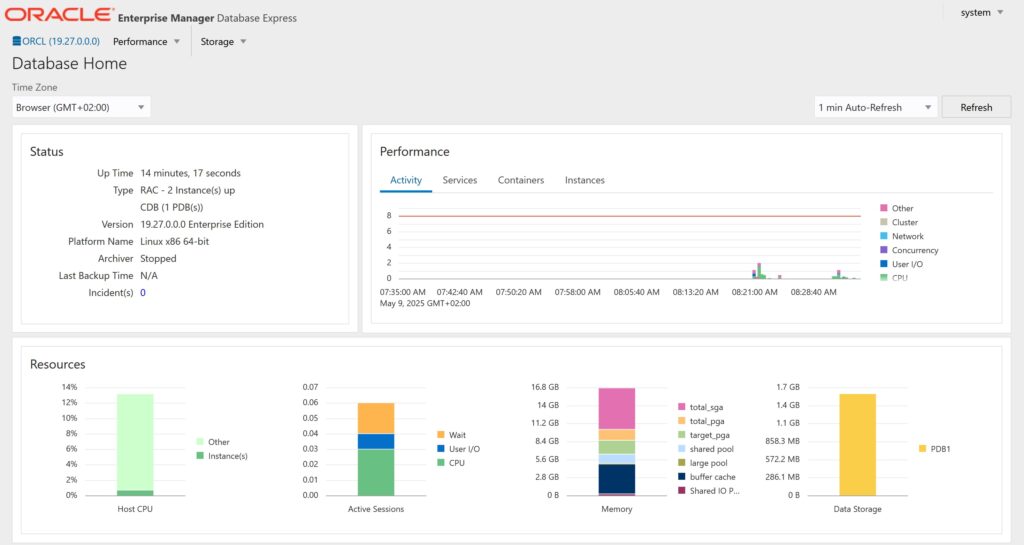
Accessing Enterprise Manager Database Express
You can login with system/changeme with a URL similar to this to access the Enterprise Manager Database Express: https://lin3.fritz.box:5500/em. This gives a lightweight GUI to manage the database:
Useful commands
# stop the database and GI services (as the grid user)
crsctl stop res -all
# start the database and GI services (as the grid user)
crsctl start res -all
# check the crs services (as the grid user)
crsctl stat res -t
To delete the orcl database:
# as oracle:
dbca -silent -deleteDatabase -sourceDB orcl -sysDBAUserName sys -forceArchiveLogDeletion -sysDBAPassword changeme -sid orcl
If you need to delete the 6 additional disk devices for ASM:
rem run this in a cmd prompt on the Windows host of the VMs
set "NODE1="
set "NODE2="
(set /p NODE1=Enter VM name of node1 ^(e.g. lin1^):
set /p NODE2=Enter VM name of cluster node 2 ^(e.g. lin2^):
call vboxmanage storageattach %NODE1% --storagectl "SATA" --port 1 --device 0 --type hdd --medium none
call vboxmanage storageattach %NODE1% --storagectl "SATA" --port 2 --device 0 --type hdd --medium none
call vboxmanage storageattach %NODE1% --storagectl "SATA" --port 3 --device 0 --type hdd --medium none
call vboxmanage storageattach %NODE1% --storagectl "SATA" --port 4 --device 0 --type hdd --medium none
call vboxmanage storageattach %NODE1% --storagectl "SATA" --port 5 --device 0 --type hdd --medium none
call vboxmanage storageattach %NODE1% --storagectl "SATA" --port 6 --device 0 --type hdd --medium none
call vboxmanage storageattach %NODE2% --storagectl "SATA" --port 1 --device 0 --type hdd --medium none
call vboxmanage storageattach %NODE2% --storagectl "SATA" --port 2 --device 0 --type hdd --medium none
call vboxmanage storageattach %NODE2% --storagectl "SATA" --port 3 --device 0 --type hdd --medium none
call vboxmanage storageattach %NODE2% --storagectl "SATA" --port 4 --device 0 --type hdd --medium none
call vboxmanage storageattach %NODE2% --storagectl "SATA" --port 5 --device 0 --type hdd --medium none
call vboxmanage storageattach %NODE2% --storagectl "SATA" --port 6 --device 0 --type hdd --medium none
call vboxmanage closemedium disk c:\vms\%NODE1%\%NODE1%_rac_1.vdi --delete
call vboxmanage closemedium disk c:\vms\%NODE1%\%NODE1%_rac_2.vdi --delete
call vboxmanage closemedium disk c:\vms\%NODE1%\%NODE1%_rac_3.vdi --delete
call vboxmanage closemedium disk c:\vms\%NODE1%\%NODE1%_rac_4.vdi --delete
call vboxmanage closemedium disk c:\vms\%NODE1%\%NODE1%_rac_5.vdi --delete
call vboxmanage closemedium disk c:\vms\%NODE1%\%NODE1%_rac_6.vdi --delete)
If you would like to install Oracle Grid Infrastructure with a GUI (Oracle Universal Installer) you can do that with:
# as the grid user start a X terminal and run
/u01/app/19.0.0/grid/gridSetup.sh
If you would like to install Oracle Database with a GUI (Oracle Universal Installer) you can do that with:
# as the oracle user start a X terminal and run
/u01/app/oracle/product/19.0.0/dbhome_1/runInstaller
Leave a Reply