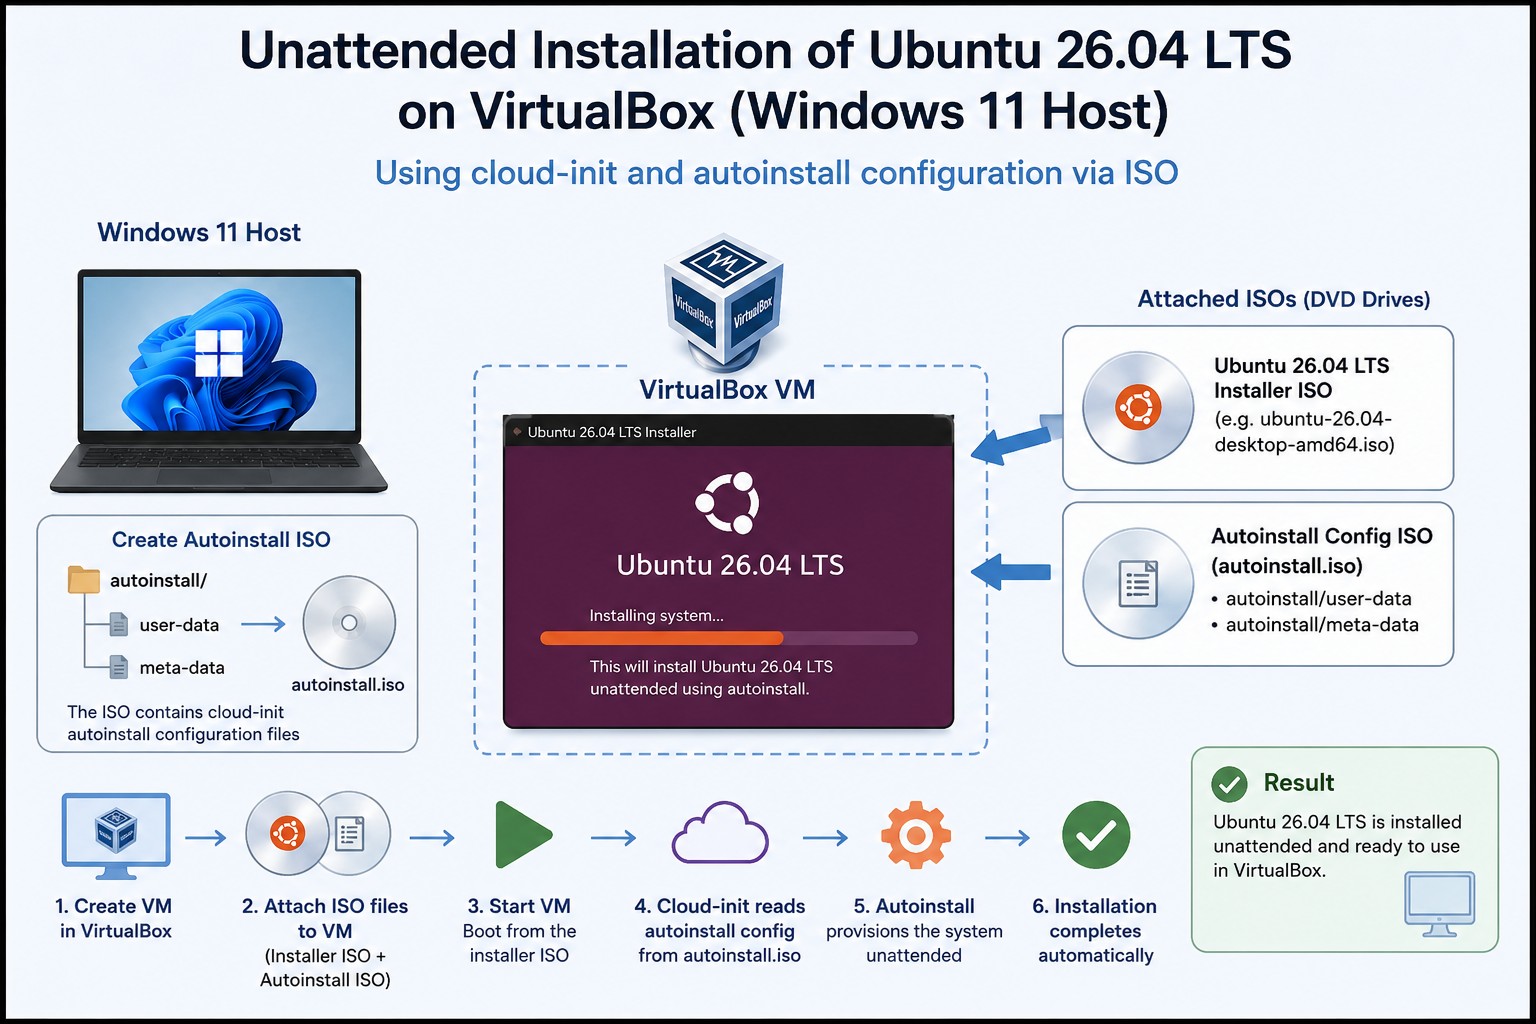
Unattended Installation of Ubuntu 26.04 with autoinstall
The following are the steps for an unattended installation of Ubuntu 26.04 on VirtualBox using autoinstall and cloud-init. The host system in my case is Windows 11.
General Preparations for new VM Installations
These steps have to be done once and can be used to install also other guest Operating Systems (e.g. Windows):
Add the path of vboxmanage to the Windows Path environment variable. For example with Win+r and then enter:
rundll32 sysdm.cpl,EditEnvironmentVariablesAdd C:\Program Files\Oracle\VirtualBox to the User variable Path.
A directory c:\vms for the virtual machines on the host system should exist:
mkdir c:\vms
Preparation of the Linux guest installation
Download the Ubuntu Desktop 26.04 LTS iso file from Ubuntu and place it in the folder c:\sw. To configure autoinstall we will create a so called seed image that we will mount into the VM as a DVD. To be able to create an iso image on Windows we will use a tool called oscdimg. We need to download the Windows Assessment and Deployment Kit (Windows ADK) Installer and install the Deployment Tools only. Next we configure the parameters of autoinstall (in my case the host name will be lin3.fritz.box) and create the is seed image (ubuntu26_seed.iso). Run the following in a PowerShell Window of the host system:
# Define paths
$sourceDir = "C:\sw\seed"
$destIso = "C:\sw\ubuntu26_seed.iso"
$isoTool = "C:\Program Files (x86)\Windows Kits\10\Assessment and Deployment Kit\Deployment Tools\amd64\Oscdimg\oscdimg.exe"

# Prompt for variables
# Ask for VM name
do {
    $VHOST = Read-Host "Enter VM name (e.g. lin1):"
    if ([string]::IsNullOrWhiteSpace($VHOST)) {
        Write-Host "VM name cannot be empty!" -ForegroundColor Red
    }
} while ([string]::IsNullOrWhiteSpace($VHOST))
# Ask for MAC address (optional)
$MAC = Read-Host "Enter the MAC address of the VM if you would like to use a dedicated MAC address. Press Enter to let VirtualBox assign a random MAC"

# 1. Create the directory (Force ignores if exists)
New-Item -Path $sourceDir -ItemType Directory -Force | Out-Null

# 2. Write the user-data file and create an empty meta-data file
# password hash can be created with: openssl passwd -6 'changeme'
$pwhash = '$6$FyNf0jRAaIv.Fmy.$FJJgceB80XcFkbkt5Gcq9t4cyIQYd3d/er4GLtCNP/pUN6ThOa10kh4G8SDuhnJwnOFS3uSsLCTAegrAbq1dH0'

$userData = @"
#cloud-config
autoinstall:
  version: 1
  refresh-installer:
    update: true
  keyboard:
    layout: "de"
  identity:
    username: user1
    hostname: $VHOST.fritz.box
    password: $pwhash
  storage:
    layout:
      name: lvm
  ssh:
    install-server: true
  packages: [telnet, bzip2, build-essential, dkms, linux-headers-generic, curl]
  debconf-selections: |
    openssh-server openssh-server/permit-root-login boolean false  # sets PermitRootLogin yes
  timezone: "Europe/Berlin"
  late-commands:
    - mount /dev/sr1 /target/mnt
    - curtin in-target --target=/target -- sh -c '/mnt/VBoxLinuxAdditions.run --nox11; true'
    - umount /target/mnt
    # Allow gdm root login (should be avoided in production)
    - curtin in-target -- sed -i 's/^\[security\]/\[security\]\nAllowRoot=true/g' /etc/gdm3/custom.conf
    - curtin in-target -- sed -i 's/^auth\trequired\tpam_succeed_if.so user != root quiet_success/#&/g' /etc/pam.d/gdm-password
    - curtin in-target -- sed -i 's/^auth\trequired\tpam_succeed_if.so user != root quiet_success/#&/g' /etc/pam.d/gdm-autologin
    # disable automatic screen lock
    - curtin in-target -- mkdir -p /etc/dconf/db/local.d
    - curtin in-target -- sh -c 'echo "user-db:user" > /etc/dconf/profile/user'
    - curtin in-target -- sh -c 'echo "system-db:local" >> /etc/dconf/profile/user'
    - curtin in-target -- sh -c 'echo "[org/gnome/desktop/screensaver]" > /etc/dconf/db/local.d/00-screen-lock'
    - curtin in-target -- sh -c 'echo "lock-enabled=false" >> /etc/dconf/db/local.d/00-screen-lock'
    - curtin in-target -- dconf update
    # set screen idle delay to never
    - curtin in-target --target=/target -- mkdir -p /etc/dconf/db/local.d/
    - curtin in-target --target=/target -- bash -c 'echo "[org/gnome/desktop/session]" > /etc/dconf/db/local.d/00-idle-delay'
    - curtin in-target --target=/target -- bash -c 'echo "idle-delay=uint32 0" >> /etc/dconf/db/local.d/00-idle-delay'
    - curtin in-target --target=/target -- dconf update
    # disable boot splash screen
    - curtin in-target -- sed -i 's/GRUB_CMDLINE_LINUX_DEFAULT="\(.*\)"/GRUB_CMDLINE_LINUX_DEFAULT=""/' /etc/default/grub
    - curtin in-target -- update-grub
    # disable gdm welcome screen (gnome-initial-setup) for new users
    - curtin in-target --target=/target -- mkdir -p /etc/skel/.config/gnome-initial-setup
    - curtin in-target --target=/target -- bash -c 'echo "yes" > /etc/skel/.config/gnome-initial-setup-done'
    - curtin in-target --target=/target -- bash -c 'touch /etc/skel/.config/gnome-initial-setup/upgrade-26.04-done'
    # disable gdm welcome screen (gnome-initial-setup) for already existing user1
    - curtin in-target --target=/target -- su - user1 -c 'mkdir -p ~/.config/gnome-initial-setup'
    - curtin in-target --target=/target -- su - user1 -c 'echo "yes" > ~/.config/gnome-initial-setup-done'
    - curtin in-target --target=/target -- su - user1 -c 'touch ~/.config/gnome-initial-setup/upgrade-26.04-done'
    # update packages
    - curtin in-target -- sh -c 'apt update; apt -y upgrade'
  user-data:
    users:
      - name: user1
        passwd: $pwhash
        shell: /bin/bash
        lock_passwd: false
        sudo: "ALL=(ALL) NOPASSWD:ALL"
    chpasswd:
      expire: false
      users:
      - {name: root, password: $pwhash}
    groups:
    - vboxsf: [root, user1]
    manage_etc_hosts: true
"@
$userData | Out-File -FilePath "$sourceDir\user-data" -Encoding ascii
New-Item -Path "$sourceDir\meta-data" -ItemType File -Force | Out-Null

# 3. Remove an existing iso file and create the seed iso image
if (Test-Path -Path $destIso) {
    Remove-Item -Path "$destIso" -Force
}

if (Test-Path $isoTool) {
    & $isoTool -m -o -n -lCIDATA "C:\sw\seed" "C:\sw\ubuntu26_seed.iso"
    Write-Host "ISO created at: $destIso"
} else {
    Write-Host "Error: $isoTool not found!" -ForegroundColor Red
}
Unattended Installation of Ubuntu 26.04 on VirtualBox with autoinstall
Run these steps in a Windows PowerShell to create the new VM and boot the VM. You probably need to adjust the parameter –bridgeadapter1 to the name of your primary interface of the Windows host system (see the Output of this command: ipconfig /all|findstr /C:Description /C:IPv|findstr /V Virtual). After the Ubuntu installer (Subiquity) has started and picked up the autoinstall config file you need to review the parameters and start the installation.
# Create and register VM
& vboxmanage createvm --name $VHOST --ostype Ubuntu25_64 --register
# Configure basic VM settings
& vboxmanage modifyvm $VHOST --clipboard-mode bidirectional --drag-and-drop bidirectional --audio-controller ac97 --audio-out on
& vboxmanage modifyvm $VHOST --memory 8192 --cpus 4 --vram 128 --graphicscontroller vmsvga --usb-ehci on --firmware efi --nested-hw-virt on
& vboxmanage setextradata $VHOST GUI/ScaleFactor 2
# Create storage controllers
& vboxmanage storagectl $VHOST --name "IDE" --add ide
& vboxmanage storagectl $VHOST --name "SATA" --add sata --bootable on
# Create and attach hard disk
& vboxmanage createmedium disk --filename "c:\vms\$VHOST\$VHOST`_1.vdi" --size 512000 --variant Standard
& vboxmanage storageattach $VHOST --storagectl "SATA" --port 0 --device 0 --type hdd --nonrotational=on --medium "c:\vms\$VHOST\$VHOST`_1.vdi"
& vboxmanage storageattach $VHOST --storagectl "IDE" --port 0 --device 0 --type dvddrive --medium "c:\sw\ubuntu-26.04-desktop-amd64.iso"
& vboxmanage storageattach $VHOST --storagectl "IDE" --port 0 --device 1 --type dvddrive --medium "C:\Program Files\Oracle\VirtualBox\VBoxGuestAdditions.iso"
& vboxmanage storageattach $VHOST --storagectl "IDE" --port 1 --device 0 --type dvddrive --medium "C:\sw\ubuntu26_seed.iso"
# Configure network (bridged adapter)
& vboxmanage modifyvm $VHOST --nic1 bridged --bridgeadapter1 "Intel(R) Ethernet Connection (2) I219-LM"
# Set MAC address if provided
if ($MAC -and $MAC.Trim() -ne '') {
    & vboxmanage modifyvm $VHOST --mac-address1 $MAC
}
# Add shared folder
& vboxmanage sharedfolder add $VHOST --name sw --hostpath c:\sw --automount --auto-mount-point /sw
# Show VM info (NIC 1 details)
& vboxmanage showvminfo $VHOST | Select-String "NIC 1"
# Start the VM
& vboxmanage startvm $VHOST --type gui
Write-Host "VM '$VHOST' created and started successfully!" -ForegroundColor Green
The second to last command shows the mac address that the VM will use. Add the IP/mac address to your local dns so that the new machine can retrieve the IP address you want to use for the VM. The installation takes about 15 minutes. All available updates from Ubuntu will be applied. Now you are able to login to the system with the IP or hostname you specified in the DNS server (username: root password: changeme). If you would like to take advantage of the poor man’s RPM cache you could enable it now :-).
Your new Ubuntu 26.04 VM is now ready to use! Have fun.
Further info
If Nested VT-x/AMD-V cannot be enabled (greyed out in the VirtualBox settings of the VM) and boot of the VM fails with:
[ 0.521637] Warning: Deprecated Hardware is detected: x86_64-v2:Genuine Intel:
Intel(R) Core(TM) i7-6700 CPU @ 3.40GHz will not be maintained in a future major release and may be disabled

[ 1.314780] RETBleed: WARNING: Spectre v2 mitigation leaves CPU vulnerable to RETBleed attacks, data leaks possible?

Fatal glibc error: CPU does not support x86-64-v3
=> make sure you turn off “Memory integrity” on the VirtualBox host system under Windows Security => Device Security => go to settings => Memory integrity
Some useful Links:
Some useful Files:
| File | Description |
|---|---|
/var/log/cloud-init-output.log | cloud-init logfile |
/var/log/installer/curtain-install.log | Curtin installer logfile |
Removing a Virtual Machine
The following PowerShell snippet will remove a Virtual Machine and delete all its associated files from the host system:
# Prompt for the VM name
$vmName = Read-Host -Prompt "Enter VM name to delete (e.g. lin1)"
# Power off the VM (forcefully)
VBoxManage controlvm $vmName poweroff
Start-Sleep -Seconds 4
# Unregister and delete all VM files
VBoxManage unregistervm $vmName --delete-all
# Remove the VM folder (if it exists)
Remove-Item -Path "C:\vms\$vmName" -Recurse -Force -ErrorAction SilentlyContinue
Updating VirtualBox Guest Additions
After installing a new version of VirtualBox on the host machine you can update the guest additions with the following commands:
# it's always good to update the packages and install kernel headers for all installed kernels
apt update
apt upgrade -y
for kernel in $(ls /boot/vmlinuz-* | grep -v rescue | sed 's/\/boot\/vmlinuz-//'); do
    apt install -y linux-headers-"$kernel"
done
# next we get the current version of the installed guest additions on the linux VM
rcvboxadd status-kernel
Sample Output (click to expand):
root@lin3:~# # it's always good to update the packages and install kernel headers for all installed kernels
apt update
apt upgrade -y
for kernel in $(ls /boot/vmlinuz-* | grep -v rescue | sed 's/\/boot\/vmlinuz-//'); do
    apt install -y linux-headers-"$kernel"
done
# next we get the current version of the installed guest additions on the linux VM
rcvboxadd status-kernel
Hit:1 http://security.ubuntu.com/ubuntu resolute-security InRelease
Hit:2 http://de.archive.ubuntu.com/ubuntu resolute InRelease
Hit:3 http://de.archive.ubuntu.com/ubuntu resolute-updates InRelease
Hit:4 http://de.archive.ubuntu.com/ubuntu resolute-backports InRelease
1 package can be upgraded. Run 'apt list --upgradable' to see it.
Not upgrading yet due to phasing:
  libgcrypt20

Summary:
  Upgrading: 0, Installing: 0, Removing: 0, Not Upgrading: 1
linux-headers-7.0.0-22-generic is already the newest version (7.0.0-22.22).
Summary:
  Upgrading: 0, Installing: 0, Removing: 0, Not Upgrading: 1
linux-headers-7.0.0-27-generic is already the newest version (7.0.0-27.27).
Summary:
  Upgrading: 0, Installing: 0, Removing: 0, Not Upgrading: 1
VirtualBox Guest Additions: kernel modules 7.2.8 r173730 are loaded
root@lin3:~#
The version of the VirtualBox host can be verified in the UI (Help => About VirtualBox)
Then we perform the update of the Guest Additions on the Linux VM by running the following commands in a PowerShell Window on the Windows host. The Virtual Machine will reboot automatically after the installation:
$VHOST = Read-Host "Enter VM name (e.g. lin1)"
& "vboxmanage" guestcontrol $VHOST updatega --verbose --reboot "--source=C:\Program Files\Oracle\VirtualBox\VBoxGuestAdditions.iso"
Sample Output (click to expand):
PS C:\Users\User1> $VHOST = Read-Host "Enter VM name (e.g. lin1)"
Enter VM name (e.g. lin1): lin3
PS C:\Users\User1> & "vboxmanage" guestcontrol $VHOST updatega --verbose --reboot "--source=C:\Program Files\Oracle\VirtualBox\VBoxGuestAdditions.iso"
Updating Guest Additions ...
Using source: C:\Program Files\Oracle\VirtualBox\VBoxGuestAdditions.iso
Guest Additions 7.2.8r173730 currently installed, waiting for Guest Additions installer to start ...
0%...10%...20%...30%...40%...50%...60%...70%...80%...90%...100%
Guest Additions update successful.
Rebooting guest ...
The guest needs to be restarted in order to make use of the updated Guest Additions.
PS C:\Users\User1>
We can then check the new version again:
# get the current version of the installed Guest Additions on the Linux VM
rcvboxadd status-kernel
Sample Output (click to expand):
root@lin3:~# # get the current version of the installed Guest Additions on the Linux VM
rcvboxadd status-kernel
VirtualBox Guest Additions: kernel modules 7.2.12 r174389 are loaded
root@lin3:~#
The update is finished. You might want to apply the fix for “rcvboxadd quicksetup always compiles” since the modifications have been overwritten by the update.
Leave a Reply