ODI 14c and writing REST data to a Oracle database
In this post we use the AutoREST driver from ODI to load data from the Wikipedia REST API into a Oracle Database table
Table of Contents
- Creating the Model file
- Creating the schema and table in the Oracle Database
- Adding the Wikipedia cert to the trusted cert store
- Setting up the AutoREST Data Server
- Setting up the Oracle Database Data Server
- Create a new ODI project and import the Knowledge Module
- Creating the ODI AutoREST model
- Creating the ODI Oracle model
- Creating a new Mapping
- Run the Mapping
- Verify the results
- Further Info
The Wikipedia API can be called with the URL: https://en.wikipedia.org/w/api.php?action=query&list=recentchanges&rcprop=title|ids|sizes|flags|user&rclimit=100&format=json. This returns a JSON file containing the recent 100 changes that have been done on Wikipedia. We will be able to adjust the number of rows we want to receive from the API as we will see later. The configuration is based on a Oracle Data Integrator 14c installation that has been patched.
Creating the Model file
To get data from the REST API we need to create a config file (called model file) for the AutoREST Data Source. The following command starts the Autonomous REST Composer in the default browser:
# run as oracle in a X terminal
/usr/lib/jvm/jdk-17.0.16-oracle-x64/bin/java -jar /home/oracle/Oracle/Middleware/Oracle_Home/oracle_common/modules/datadirect/wlautorest.jar --design
We click on “Create Model” and fill the fields as follows:
- Model Name:
wiki(the model file will be named as follows: wiki.rest) - Base URL:
https://en.wikipedia.org
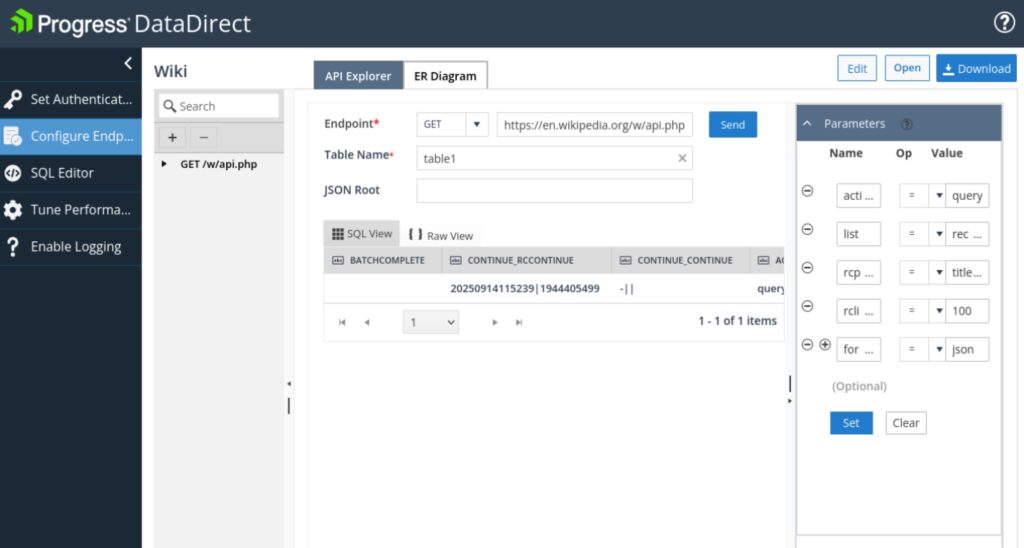
Clicking OK brings us to the Composer. On the tab “Set Authentication” we could enter authorization data for the REST API. But we don’t need that for the Wikipedia API. On the “Configure Endpoints” tab we enter the following data:
- Endpoint: GET,
w/api.php?action=query&list=recentchanges&rcprop=title|ids|sizes|flags|user&rclimit=100&format=json - Table Name:
table1
Press TAB and click “Send” to test if the API sends data. We should see something similar to this:
Adjusting column names
In the case of this Wikipedia API call, there is a column named “user” that contains the username of the user that performed the edits on Wikipedia. Since the word user is an Oracle/ANSI reserved word we need to change it unless we will get the following errors later in ODI:
ODI-1590: The execution of the script failed.
Caused By: javax.script.ScriptException: javax.script.ScriptException: java.sql.SQLSyntaxErrorException: ORA-00904: : invalid identifier
Caused by: Error : 904, Position : 31, SQL =
create table USER2.C$_0JOIN
(
USER VARCHAR2(58)
), Original SQL =
create table USER2.C$_0JOIN
(
USER VARCHAR2(58)
), Error Message = ORA-00904: : invalid identifier

	at oracle.jdbc.driver.T4CTTIoer11.processError(T4CTTIoer11.java:723)
	... 49 more

and as a foloow-up error in the next step:
ODI-1228: Task Insert new rows-LKM SQL to Oracle (Built-In)-Load JOIN_AP fails on the target connection OraDS.
Caused by: java.sql.BatchUpdateException: ORA-00928: missing SELECT keyword
Caused by: Sql =
INSERT INTO USER2.C$_0JOIN (
      USER
      )
      VALUES(
       :USER
      )

, Error Msg = java.sql.BatchUpdateException: ORA-00928: missing SELECT keyword
To avoid this we expand /GET /w/api.php on the left side and expand the table RECENTCHANGES. Right click on the “user” column => “Modify Column Attributes” and give the column the new name WUSER. Click Save. We can now Download the model file by pressing the Download icon.
Creating the schema and table in the Oracle Database
After the data has been received from the API we want to store it in a Oracle Database. We will create a schema and a table with the following script:
# run as the root user
cat > /tmp/s.sql <<EOF
alter session set container=pdb1;
grant dba to user2 identified by changeme;
create table user2.wchanges(
actiontype varchar2(2048),
title varchar2(2048),
username varchar2(2048)
);
exit
EOF
su - oracle -c 'sqlplus -S / as sysdba @/tmp/s.sql'
Sample Output (click to expand):
[root@lin7 ~]# su - oracle -c 'sqlplus -S / as sysdba @/tmp/s.sql'

Session altered.


Grant succeeded.


Table created.

[root@lin7 ~]#
Adding the Wikipedia cert to the trusted cert store
We can use the script from here to add the public certificate from en.wikipedia.org to the trusted key store.
# run as root
cacerts.sh en.wikipedia.org
Sample Output (click to expand):
[root@lin7 ~]# cacerts.sh en.wikipedia.org
Enter keystore password:  Owner: CN=*.wikipedia.org
Issuer: CN=E6, O=Let's Encrypt, C=US
Serial number: 6b2032b3c6ed8350101148ebb08bf97587f
Valid from: Mon Aug 11 01:56:29 CEST 2025 until: Sun Nov 09 00:56:28 CET 2025
Certificate fingerprints:
         SHA1: 13:70:FF:02:60:68:9C:37:26:53:3E:61:88:7A:BC:D3:EF:F1:ED:2B
         SHA256: 99:0F:3F:D9:E4:4F:87:62:1A:CF:E3:0D:21:44:15:0D:96:82:8C:5E:5F:E3:16:02:7D:3C:F1:AF:92:7F:9B:3B
Signature algorithm name: SHA384withECDSA
Subject Public Key Algorithm: 256-bit EC (secp256r1) key
Version: 3

Extensions:

#1: ObjectId: 1.3.6.1.4.1.11129.2.4.2 Criticality=false
0000: 04 81 F0 00 EE 00 75 00   CC FB 0F 6A 85 71 09 65  ......u....j.q.e
0010: FE 95 9B 53 CE E9 B2 7C   22 E9 85 5C 0D 97 8D B6  ...S...."..\....
0020: A9 7E 54 C0 FE 4C 0D B0   00 00 01 98 96 9F 9D 61  ..T..L.........a
0030: 00 00 04 03 00 46 30 44   02 20 6F 95 DA FB 6F 8C  .....F0D. o...o.
0040: F9 A2 50 40 78 6A 55 AA   41 CB 66 20 76 A7 B0 92  ..P@xjU.A.f v...
0050: 61 E7 01 12 B3 DC F8 E9   DD 60 02 20 1F 54 5D 52  a........`. .T]R
0060: 30 CF C1 6A 34 FA 2A E8   07 A5 9F 91 F4 4A B9 F5  0..j4.*......J..
0070: A0 B4 2A 3D 82 AC 1F 0D   E8 87 5F 58 00 75 00 DD  ..*=......_X.u..
0080: DC CA 34 95 D7 E1 16 05   E7 95 32 FA C7 9F F8 3D  ..4.......2....=
0090: 1C 50 DF DB 00 3A 14 12   76 0A 2C AC BB C8 2A 00  .P...:..v.,...*.
00A0: 00 01 98 96 9F 9D 88 00   00 04 03 00 46 30 44 02  ............F0D.
00B0: 20 71 B4 69 87 3C CA 3C   B9 D9 16 24 D7 99 10 33   q.i.<.<...$...3
00C0: 31 D7 E1 C8 0F EC 07 23   B3 92 61 C1 FE AC 3E F6  1......#..a...>.
00D0: 1F 02 20 4E 5F 77 B0 4F   4B 18 35 CE 45 71 06 65  .. N_w.OK.5.Eq.e
00E0: 0C A1 8A 82 79 8F 56 57   A0 81 DD DC CD 6C 61 D9  ....y.VW.....la.
00F0: 46 3C AD                                           F<.


#2: ObjectId: 1.3.6.1.5.5.7.1.1 Criticality=false
AuthorityInfoAccess [
  [
   accessMethod: caIssuers
   accessLocation: URIName: http://e6.i.lencr.org/
]
]

#3: ObjectId: 2.5.29.35 Criticality=false
AuthorityKeyIdentifier [
KeyIdentifier [
0000: 93 27 46 98 03 A9 51 68   8E 98 D6 C4 42 48 DB 23  .'F...Qh....BH.#
0010: BF 58 94 D2                                        .X..
]
]

#4: ObjectId: 2.5.29.19 Criticality=true
BasicConstraints:[
  CA:false
  PathLen: undefined
]

#5: ObjectId: 2.5.29.31 Criticality=false
CRLDistributionPoints [
  [DistributionPoint:
     [URIName: http://e6.c.lencr.org/128.crl]
]]

#6: ObjectId: 2.5.29.32 Criticality=false
CertificatePolicies [
  [CertificatePolicyId: [2.23.140.1.2.1]
[]  ]
]

#7: ObjectId: 2.5.29.37 Criticality=false
ExtendedKeyUsages [
  serverAuth
  clientAuth
]

#8: ObjectId: 2.5.29.15 Criticality=true
KeyUsage [
  DigitalSignature
]

#9: ObjectId: 2.5.29.17 Criticality=false
SubjectAlternativeName [
  DNSName: *.m.mediawiki.org
  DNSName: *.m.wikibooks.org
  DNSName: *.m.wikidata.org
  DNSName: *.m.wikimedia.org
  DNSName: *.m.wikinews.org
  DNSName: *.m.wikipedia.org
  DNSName: *.m.wikiquote.org
  DNSName: *.m.wikisource.org
  DNSName: *.m.wikiversity.org
  DNSName: *.m.wikivoyage.org
  DNSName: *.m.wiktionary.org
  DNSName: *.mediawiki.org
  DNSName: *.planet.wikimedia.org
  DNSName: *.wikibooks.org
  DNSName: *.wikidata.org
  DNSName: *.wikifunctions.org
  DNSName: *.wikimedia.org
  DNSName: *.wikimediafoundation.org
  DNSName: *.wikinews.org
  DNSName: *.wikipedia.org
  DNSName: *.wikiquote.org
  DNSName: *.wikisource.org
  DNSName: *.wikiversity.org
  DNSName: *.wikivoyage.org
  DNSName: *.wiktionary.org
  DNSName: *.wmfusercontent.org
  DNSName: mediawiki.org
  DNSName: w.wiki
  DNSName: wikibooks.org
  DNSName: wikidata.org
  DNSName: wikifunctions.org
  DNSName: wikimedia.org
  DNSName: wikimediafoundation.org
  DNSName: wikinews.org
  DNSName: wikipedia.org
  DNSName: wikiquote.org
  DNSName: wikisource.org
  DNSName: wikiversity.org
  DNSName: wikivoyage.org
  DNSName: wiktionary.org
  DNSName: wmfusercontent.org
]

#10: ObjectId: 2.5.29.14 Criticality=false
SubjectKeyIdentifier [
KeyIdentifier [
0000: 61 00 A9 61 BB A0 6D B1   F2 BF 07 47 64 8E 72 E7  a..a..m....Gd.r.
0010: 17 B1 96 14                                        ....
]
]

Trust this certificate? [no]:  Certificate was added to keystore
[root@lin7 ~]#
Setting up the AutoREST Data Server
We start ODI Studio, connect to the work repository and go to Topology => Technologies => right click on “Generic Rest Config” => New Data Server. We enter the following information:
- Definition / Name:
WikiDS - JDBC / JDBC URL:
jdbc:weblogic:autorest:https://en.wikipedia.org/;Config=/home/oracle/Downloads/wiki.rest;
Click “Save” and right Click on the WikiDS Data Server under “Generic Rest Config” => “New Physical Schema”. Enter the following information:
- Definition / Owner (Schema):
AUTOREST - Definition / Owner (Work Schema):
AUTOREST - Context: Add Context: Global Logical Schema:
WikiLS
After Saving the new Physical Schema and the new Logical Schema get created.
Setting up the Oracle Database Data Server
We start ODI Studio, connect to the work repository and go to Topology => Technologies => right click on “Oracle” => New Data Server. We enter the following information:
- Definition / Name:
OraDS - Definition / user:
user2 - Definition / Password:
changeme - JDBC / JDBC URL:
jdbc:oracle:thin:@lin7.fritz.box:1521/pdb1.fritz.box
Click “Save” and right Click on the OraDS Data Server under “Oracle” => “New Physical Schema”. Enter the following information:
- Definition / Schema (Schema):
user2 - Definition / Schema (Work Schema):
user2 - Context: Add Context: Global Logical Schema:
OraLS
After Saving the new Physical Schema and the new Logical Schema get created.
Create a new ODI project and import the Knowledge Module
In the Designer tab create a new project named WikiProject and click save. Expand the newly created project and right click on Knowledge Modules => “Import Knowledge Modules”. Select "RKM SQL (Python)" and click OK to import the Knowledge Module.
Creating the ODI AutoREST model
In ODI Studio we go to Designer tab, Models and create a “New Model Folder” if none exists. Right click on the model folder and select “New Model”. Enter the following data:
- Definition / Name:
WikiModel - Definition / Technology:
Generic JDBC - Definition / Logical Schema:
WikiLS
In the “Reverse Eingineer” tab select “Customized”, tick all “Types of Objects to reverse-engineer” and select “RKM SQL (Python).WikiProject” in the Knowledge Module field. Click on “Reverse Engineer”. The model will be saved automatically.
Creating the ODI Oracle model
In ODI Studio we go to Designer tab, Models and create a “New Model Folder” if none exists. Right click on the model folder and select “New Model”. Enter the following data:
- Definition / Name:
OraModel - Definition / Technology:
Oracle - Definition / Logical Schema:
OraLS
Click on “Reverse Engineer”. The model will be saved automatically.
Creating a new Mapping
In the ODI Studio Designer expand the project “WikiProject” and expand FirstFolder. Right click on Mappings => New Mapping. Choose “WikiMapping” as the name and deselect “Create empty Dataset”. Drag the following objects into the blank mapping space:
- From the WikiModel:
RECENTCHANGES - From the Components panel: Filter
- From the OraModel:
WCHANGES
Connect the output of RECENTCHANGES with the input of the filter and the output of the filter with the input of WCHANGES (deselect Auto Map” in the “Attribute Matching” window). Select the filter and enter “recentchanges.rclimit=7” in the Filter Condition box of the filter properties (Condition tab). This is where we define how much rows we want to query from the API. The last step is to drag the following columns from the RECENTCHANGES model (REST API) to the WCHANGES Oracle table:
- type => actiontype
- title => title
- wuser => username
We can validate the mapping by clicking the green check mark. If all went well the mapping should look like this:
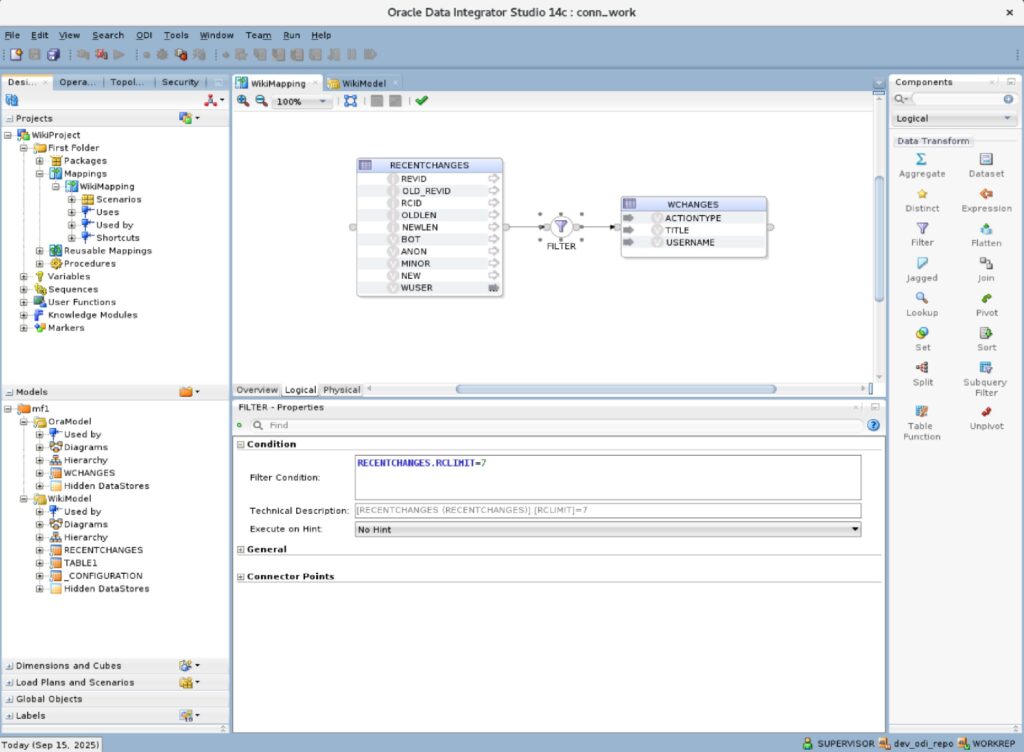
Save the mapping.
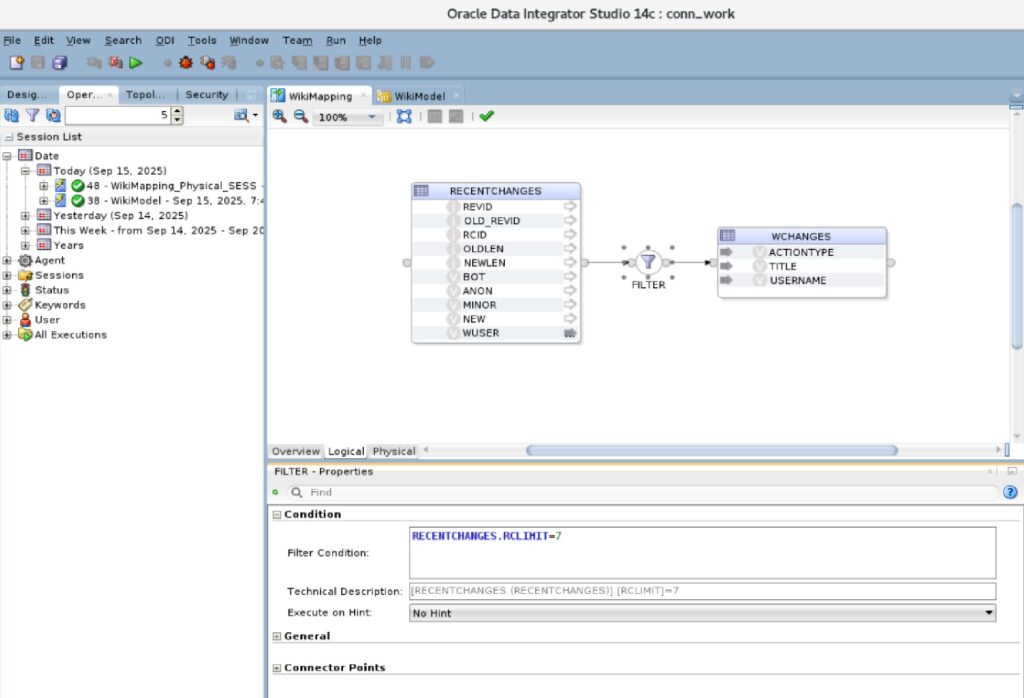
Run the Mapping
The mapping can be started by clicking on the green play button and clicking OK in the “Run” popup. We can check in the “Operator” Window (Expand Date => Expand Today) if the job ran successfully:
Verify the results
We can use the following query to check if the data has been inserted in the Oracle table:
# run as the root user
cat > /tmp/s.sql <<EOF
set lines 200 pages 66
col actiontype for a20
col title for a60
col username for a40
alter session set container=pdb1;
select * from user2.wchanges;
exit
EOF
su - oracle -c 'sqlplus -S / as sysdba @/tmp/s.sql'
Sample Output (click to expand):
ACTIONTYPE           TITLE                                                        USERNAME
-------------------- ------------------------------------------------------------ ----------------------------------------
query                Talk:Stephanie Spielmann                                     Jevansen
query                Days of Pearly Spencer                                       GreenC bot
query                1942-43 Division 2                                           AnomieBOT
query                Daniel Levin (author)                                        GreenC bot
query                Category:Women's football task force articles                Jevansen
query                Category:Stub-Class Women's football articles                Jevansen
query                Talk:Vesna Milivojevic                                       Jevansen

7 rows selected.
Leave a Reply