
Install RedHat OpenShift Local on Windows 11
This post shows how to install the current version (2.65) of RedHat OpenShift Local on a Windows 11 system. OpenShift Local (previously known as CodeReady Containers or CRC) runs a complete single node OpenShift 5.0.0 cluster on a laptop or desktop PC and is perfect for development and testing.
OpenShift Local is not meant for production use. The cluster consists of one node which acts as control plane and worker at the same time, and it cannot be upgraded to a newer OpenShift version (a new version requires deleting and recreating the cluster). For learning Kubernetes and OpenShift, testing deployments or running a database operator locally it is a great tool.
Prerequisites
OpenShift Local has the following minimum requirements on Windows (OpenShift preset):
- Fully updated Windows 11 Pro, Enterprise or Education (Windows Home Edition is not supported)
- 4 physical CPU cores (Intel 64 or AMD64)
- 10.5 GB of free memory (16 GB or more is recommended)
- 35 GB of free disk space on drive C: (OpenShift Local cannot run from a network drive)
- Virtualization enabled in the BIOS/UEFI
- A physical machine: nested virtualization is not supported, so OpenShift Local cannot be installed inside a VirtualBox or Hyper-V VM
- A user account which is allowed to elevate to Administrator privileges
- A free RedHat Developer account
We can check the Windows edition, the number of CPU cores and the free memory in a PowerShell window:
# Windows edition (must not be "Home")
(Get-CimInstance Win32_OperatingSystem).Caption
# number of physical CPU cores
(Get-CimInstance Win32_Processor | Measure-Object -Property NumberOfCores -Sum).Sum
# free memory in GB
[math]::Round((Get-CimInstance Win32_OperatingSystem).FreePhysicalMemory/1MB,1)
# free disk space on C: in GB
[math]::Round((Get-PSDrive C).Free/1GB,1)
Sample Output (click to expand):
PS C:\Users\User1> # Windows edition (must not be "Home")
PS C:\Users\User1> (Get-CimInstance Win32_OperatingSystem).Caption
Microsoft Windows 11 Pro
PS C:\Users\User1> # number of physical CPU cores
PS C:\Users\User1> (Get-CimInstance Win32_Processor | Measure-Object -Property NumberOfCores -Sum).Sum
4
PS C:\Users\User1> # free memory in GB
PS C:\Users\User1> [math]::Round((Get-CimInstance Win32_OperatingSystem).FreePhysicalMemory/1MB,1)
15,7
PS C:\Users\User1> # free disk space on C: in GB
PS C:\Users\User1> [math]::Round((Get-PSDrive C).Free/1GB,1)
299,7
PS C:\Users\User1>
A note for VirtualBox users
OpenShift Local uses Hyper-V on Windows. The setup enables Hyper-V automatically. Current VirtualBox versions still run when Hyper-V is enabled (VirtualBox then uses the Windows Hypervisor Platform), but the VMs are noticeably slower. If you mainly work with VirtualBox VMs (like in my other posts) you can disable Hyper-V again after testing OpenShift Local (see the section “Removing OpenShift Local”).
Downloading the Installation Files
The installer and the pull secret can be downloaded from the RedHat Hybrid Cloud Console. To be able to download the software we can create a free RedHat Developer account.
On the download page we select “Windows” as the platform and download:
- the OpenShift Local installer (crc-windows-installer.zip)
- the pull secret (pull-secret.txt)
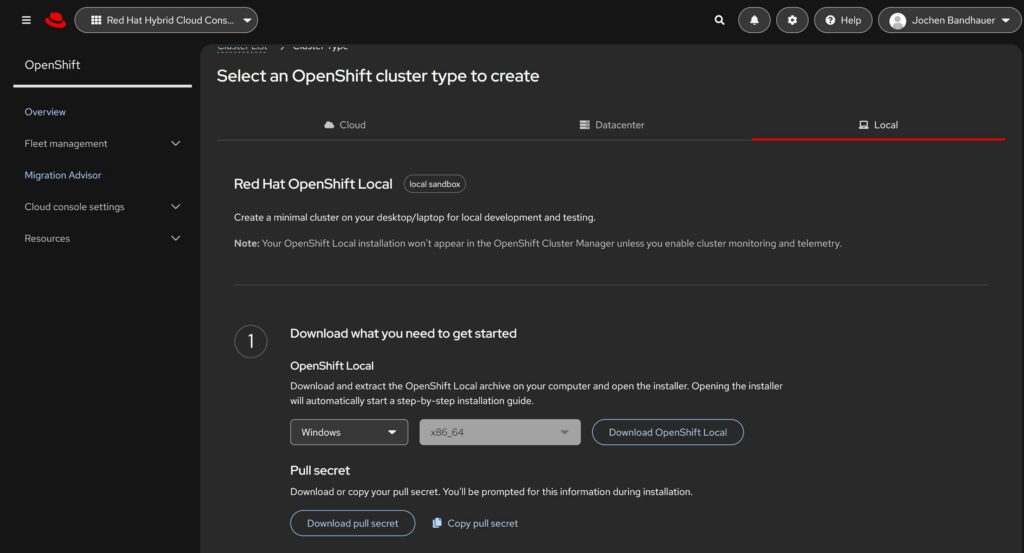
In this example both files are stored in C:\sw\openshift.
Installing OpenShift Local
We extract the archive and start the MSI installer in a PowerShell window:
cd C:\sw\openshift
# extract the installer
Expand-Archive -Path .\crc-windows-installer.zip -DestinationPath . -Force
# start the guided installer
Start-Process msiexec.exe -ArgumentList '/i', "$PWD\crc-windows-amd64.msi" -Wait
We follow the instructions of the installer and accept the defaults. At the end the installer asks for a reboot of the system, which is required because Hyper-V is enabled and the current user is added to the local group crc-users.
After the reboot we can check the installed version in a new PowerShell window:
crc version
Sample Output (click to expand):
PS C:\Users\User1> crc version
CRC version: 2.65.0+
OpenShift version: 5.0.0
MicroShift version: 5.0.0
PS C:\Users\User1>
Configuring OpenShift Local
Important: the crc command must be run as a normal user and not in an elevated (Administrator) PowerShell window. Whenever administrative rights are needed, crc elevates itself through the Windows UAC dialog.
Before the first start we adjust the configuration. The defaults (4 vCPUs, 10.5 GB RAM, 31 GB disk) are the absolute minimum. If the machine has enough resources it is a good idea to increase these values, especially if we want to install additional operators later.
# do not send telemetry data to RedHat
crc config set consent-telemetry no
# use the full OpenShift Container Platform (other presets: microshift, okd)
crc config set preset openshift
# number of vCPUs for the OpenShift VM
crc config set cpus 6
# memory of the OpenShift VM in MiB (16 GB)
crc config set memory 16384
# size of the virtual disk in GiB
crc config set disk-size 60
# location of the pull secret (we do not need to paste it during the start)
crc config set pull-secret-file C:\sw\openshift\pull-secret.txt
# show the configuration
crc config view
Sample Output (click to expand):
PS C:\Users\User1> # do not send telemetry data to RedHat
PS C:\Users\User1> crc config set consent-telemetry no
Successfully configured consent-telemetry to no
PS C:\Users\User1> # use the full OpenShift Container Platform (other presets: microshift, okd)
PS C:\Users\User1> crc config set preset openshift
To confirm your system is ready, and you have the needed system bundle, please run 'crc setup' before 'crc start'.
PS C:\Users\User1> # number of vCPUs for the OpenShift VM
PS C:\Users\User1> crc config set cpus 6
Changes to configuration property 'cpus' are only applied when the CRC instance is started.
If you already have a running CRC instance, then for this configuration change to take effect, stop the CRC instance with 'crc stop' and restart it with 'crc start'.
PS C:\Users\User1> # memory of the OpenShift VM in MiB (16 GB)
PS C:\Users\User1> crc config set memory 16384
Changes to configuration property 'memory' are only applied when the CRC instance is started.
If you already have a running CRC instance, then for this configuration change to take effect, stop the CRC instance with 'crc stop' and restart it with 'crc start'.
PS C:\Users\User1> # size of the virtual disk in GiB
PS C:\Users\User1> crc config set disk-size 60
Changes to configuration property 'disk-size' are only applied when the CRC instance is started.
If you already have a running CRC instance, then for this configuration change to take effect, stop the CRC instance with 'crc stop' and restart it with 'crc start'.
PS C:\Users\User1> # location of the pull secret (we do not need to paste it during the start)
PS C:\Users\User1> crc config set pull-secret-file C:\sw\openshift\pull-secret.txt
Successfully configured pull-secret-file to C:\sw\openshift\pull-secret.txt
PS C:\Users\User1> # show the configuration
PS C:\Users\User1> crc config view
- consent-telemetry                     : no
- cpus                                  : 6
- disk-size                             : 60
- memory                                : 16384
- pull-secret-file                      : C:\sw\openshift\pull-secret.txt
PS C:\Users\User1>
Setting up the Host
The command crc setup checks the host system and prepares it for OpenShift Local. It verifies the Hyper-V installation, checks the membership in the crc-users group, starts the admin helper service (which maintains the hosts file entries for *.crc.testing) and downloads the OpenShift bundle (about 5 GB).
crc setup
Sample Output (click to expand):
PS C:\Users\User1> crc setup
INFO Using bundle path C:\Users\User1\.crc\cache\crc_hyperv_5.0.0_amd64.crcbundle
INFO Checking minimum RAM requirements
INFO Checking if running in a shell with administrator rights
INFO Checking Windows release
INFO Checking Windows edition
INFO Checking if Hyper-V is installed and operational
INFO Checking if Hyper-V service is enabled
INFO Checking if crc-users group exists
INFO Checking if current user is in crc-users and Hyper-V admins group
INFO Checking if vsock is correctly configured
INFO Checking if CRC bundle is extracted in '$HOME/.crc'
INFO Checking if C:\Users\User1\.crc\cache\crc_hyperv_5.0.0_amd64.crcbundle exists
INFO Getting bundle for the CRC executable
INFO Downloading bundle: C:\Users\User1\.crc\cache\crc_hyperv_5.0.0_amd64.crcbundle...
4.99 GiB / 4.99 GiB [-----------------------------------------------------------------------------] 100.00% 10.09 MiB/s
INFO Uncompressing C:\Users\User1\.crc\cache\crc_hyperv_5.0.0_amd64.crcbundle
crc.vhdx:  21.23 GiB / 21.23 GiB [----------------------------------------------------------------------------] 100.00%
oc.exe:  105.23 MiB / 105.23 MiB [----------------------------------------------------------------------------] 100.00%
INFO Checking if the win32 background launcher is installed
INFO Checking if the daemon task is installed
INFO Installing the daemon task
INFO Checking if the daemon task is running
INFO Running the daemon task
INFO Checking admin helper service is running
INFO Checking SSH port availability
Your system is correctly setup for using CRC. Use 'crc start' to start the instance
PS C:\Users\User1>
If crc setup reports that the user is not a member of the crc-users group or that Hyper-V is not yet enabled, we need to log off (or reboot) and run crc setup again.
Starting the Cluster
Now we can start the cluster. The first start takes about 10–20 minutes, depending on the hardware.
crc start
Sample Output (abbreviated) (click to expand):
PS C:\Users\User1> crc start
INFO Using bundle path C:\Users\User1\.crc\cache\crc_hyperv_5.0.0_amd64.crcbundle
INFO Checking minimum RAM requirements
INFO Checking if running in a shell with administrator rights
INFO Checking Windows release
INFO Checking Windows edition
INFO Checking if Hyper-V is installed and operational
INFO Checking if Hyper-V service is enabled
INFO Checking if crc-users group exists
INFO Checking if current user is in crc-users and Hyper-V admins group
INFO Checking if vsock is correctly configured
INFO Checking if the win32 background launcher is installed
INFO Checking if the daemon task is installed
INFO Checking if the daemon task is running
INFO Checking admin helper service is running
INFO Checking SSH port availability
INFO Loading bundle: crc_hyperv_5.0.0_amd64...
INFO Creating CRC VM for OpenShift 5.0.0...
INFO Generating new SSH key pair...
INFO Generating new password for the kubeadmin user
INFO Starting CRC VM for openshift 5.0.0...
INFO CRC instance is running with IP 127.0.0.1
INFO CRC VM is running
INFO Updating authorized keys...
INFO Resizing /dev/sda4 filesystem
INFO Configuring shared directories
INFO Check internal and public DNS query...
INFO Check DNS query from host...
INFO Verifying validity of the kubelet certificates...
INFO Starting kubelet service
INFO Waiting for kube-apiserver availability... [takes around 2min]
INFO Adding user's pull secret to the cluster...
INFO Updating SSH key to machine config resource...
INFO Overriding password for developer user
INFO Changing the password for the users
INFO Updating cluster ID...
INFO Updating root CA cert to admin-kubeconfig-client-ca configmap...
INFO Starting openshift instance... [waiting for the cluster to stabilize]
INFO 3 operators are progressing: openshift-controller-manager, operator-lifecycle-manager-packageserver, service-ca
INFO 2 operators are progressing: authentication, image-registry
INFO All operators are available. Ensuring stability...
INFO Operators are stable (2/3)...
INFO Operators are stable (3/3)...
INFO Waiting until the user's pull secret is written to the instance disk...
INFO Adding crc-admin and crc-developer contexts to kubeconfig...
Started the OpenShift cluster.

The server is accessible via web console at:
  https://console-openshift-console.apps-crc.testing

Log in as administrator:
  Username: kubeadmin
  Password: xxxxx-xxxxx-xxxxx-xxxxx

Log in as user:
  Username: developer
  Password: developer

Use the 'oc' command line interface:
  PS> & crc oc-env | Invoke-Expression
  PS> oc login -u developer https://api.crc.testing:6443
PS C:\Users\User1>
The status of the cluster can be checked with:
crc statusSample Output (click to expand):
PS C:\Users\User1> crc status
CRC VM:          Running
OpenShift:       Running (v5.0.0)
RAM Usage:       7.697GB of 16.76GB
Disk Usage:      24.48GB of 63.82GB (Inside the CRC VM)
Cache Usage:     28.26GB
Cache Directory: C:\Users\User1\.crc\cache
PS C:\Users\User1>
Using the oc Command Line Interface
OpenShift Local ships with the matching version of the oc client. To add it to the PATH of the current PowerShell session we run:
& crc oc-env | Invoke-ExpressionTo make this permanent we can add the line to our PowerShell profile:
Set-ExecutionPolicy -Scope CurrentUser -ExecutionPolicy RemoteSigned
if (!(Test-Path $PROFILE)) { New-Item -ItemType File -Path $PROFILE -Force }
Add-Content -Path $PROFILE -Value '& crc oc-env | Invoke-Expression'
Now we log in as the cluster administrator and take a first look at the cluster. The kubeadmin password is shown at the end of crc start or with crc console –credentials.
# show the passwords of the users kubeadmin and developer
crc console --credentials
# log in as cluster administrator
oc login -u kubeadmin https://api.crc.testing:6443
# the single node acts as control plane and worker
oc get nodes
# all cluster operators should be Available
oc get clusteroperators
# OpenShift and Kubernetes version
oc version
Sample Output (click to expand):
PS C:\Users\User1> oc login -u kubeadmin https://api.crc.testing:6443
Logged into "https://api.crc.testing:6443" as "kubeadmin" using existing credentials.

You have access to 65 projects, the list has been suppressed. You can list all projects with 'oc projects'

Using project "default".
PS C:\Users\User1> oc get nodes
NAME   STATUS   ROLES                         AGE   VERSION
crc    Ready    control-plane,master,worker   18d   v1.36.5
PS C:\Users\User1> oc get clusteroperators
NAME                                       VERSION   AVAILABLE   PROGRESSING   DEGRADED   SINCE   MESSAGE
authentication                             5.0.0     True        False         False      18m
config-operator                            5.0.0     True        False         False      18d
console                                    5.0.0     True        False         False      18m
control-plane-machine-set                  5.0.0     True        False         False      18d
dns                                        5.0.0     True        False         False      18d
etcd                                       5.0.0     True        False         False      18d
image-registry                             5.0.0     True        False         False      18m
ingress                                    5.0.0     True        False         False      18d
kube-apiserver                             5.0.0     True        False         False      18d
kube-controller-manager                    5.0.0     True        False         False      18d
kube-scheduler                             5.0.0     True        False         False      18d
kube-storage-version-migrator              5.0.0     True        False         False      18m
machine-api                                5.0.0     True        False         False      18d
machine-approver                           5.0.0     True        False         False      18d
machine-config                             5.0.0     True        False         False      18d
marketplace                                5.0.0     True        False         False      18d
network                                    5.0.0     True        False         False      18d
openshift-apiserver                        5.0.0     True        False         False      18m
openshift-controller-manager               5.0.0     True        False         False      18m
openshift-samples                          5.0.0     True        False         False      18d
operator-lifecycle-manager                 5.0.0     True        False         False      18d
operator-lifecycle-manager-catalog         5.0.0     True        False         False      18d
operator-lifecycle-manager-packageserver   5.0.0     True        False         False      18m
service-ca                                 5.0.0     True        False         False      18d
PS C:\Users\User1> oc version
Client Version: 5.0.0
Kustomize Version: v5.8.1
Server Version: 5.0.0
Kubernetes Version: v1.36.5
PS C:\Users\User1>
Accessing the Web Console
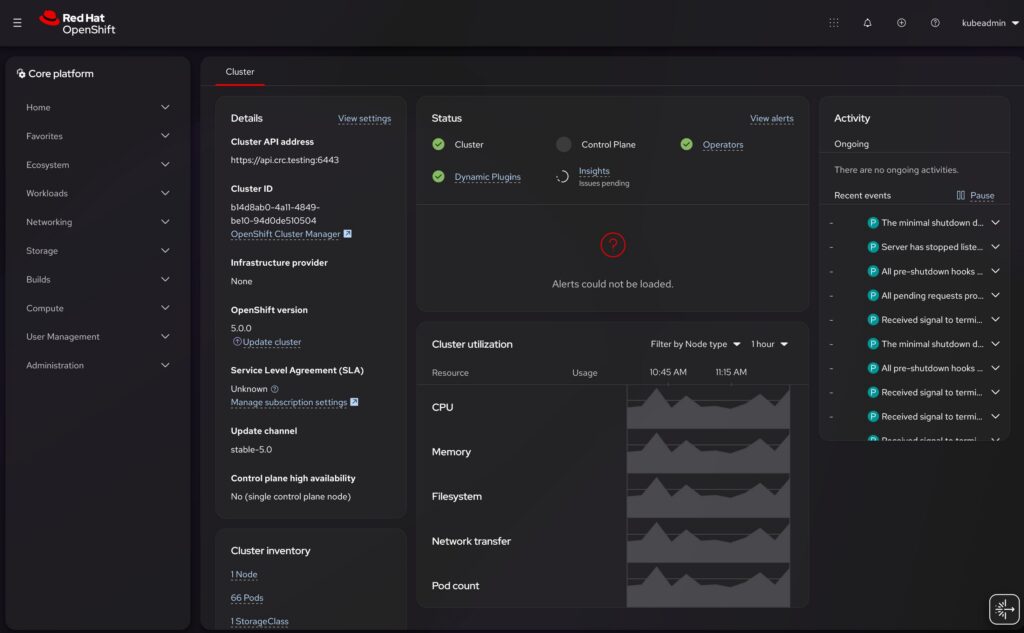
The web console can be opened in the default browser with:
crc consoleThe console is available at https://console-openshift-console.apps-crc.testing. We can log in with the user kubeadmin (cluster administrator) or with the user developer and the password developer (normal user).
Deploying a first Application
To test the cluster we deploy a small web application as the user developer, create a route and call it from Windows:
# log in as normal user
oc login -u developer -p developer https://api.crc.testing:6443
# create a new project (namespace)
oc new-project demo
# deploy a simple web server image
oc new-app --image=docker.io/openshift/hello-openshift --name=hello
# wait until the deployment is ready (returns when the pod is running)
oc rollout status deployment/hello
# make the service available from outside the cluster
oc expose service/hello --port=8080
oc get route hello
# call the application (use curl.exe, curl in PowerShell is an alias of Invoke-WebRequest)
curl.exe http://hello-demo.apps-crc.testing
Sample Output (click to expand):
PS C:\Users\User1> # log in as normal user
PS C:\Users\User1> oc login -u developer -p developer https://api.crc.testing:6443
Login successful.

You don't have any projects. You can try to create a new project, by running

    oc new-project <projectname>

PS C:\Users\User1> # create a new project (namespace)
PS C:\Users\User1> oc new-project demo
Now using project "demo" on server "https://api.crc.testing:6443".

You can add applications to this project with the 'new-app' command. For example, try:

    oc new-app rails-postgresql-example

to build a new example application in Ruby. Or use kubectl to deploy a simple Kubernetes application:

    kubectl create deployment hello-node --image=registry.k8s.io/e2e-test-images/agnhost:2.43 -- /agnhost serve-hostname

PS C:\Users\User1> # deploy a simple web server image
PS C:\Users\User1> oc new-app --image=docker.io/openshift/hello-openshift --name=hello
--> Found container image 7af3297 (8 years old) from docker.io for "docker.io/openshift/hello-openshift"

    * An image stream tag will be created as "hello:latest" that will track this image

--> Creating resources ...
    imagestream.image.openshift.io "hello" created
    deployment.apps "hello" created
    service "hello" created
--> Success
    Application is not exposed. You can expose services to the outside world by executing one or more of the commands below:
     'oc expose service/hello'
    Run 'oc status' to view your app.
PS C:\Users\User1> # wait until the deployment is ready (returns when the pod is running)
PS C:\Users\User1> oc rollout status deployment/hello
Waiting for deployment "hello" rollout to finish: 0 out of 1 new replicas have been updated...
Waiting for deployment spec update to be observed...
Waiting for deployment spec update to be observed...
Waiting for deployment "hello" rollout to finish: 0 out of 1 new replicas have been updated...
Waiting for deployment "hello" rollout to finish: 0 of 1 updated replicas are available...
deployment "hello" successfully rolled out
PS C:\Users\User1> # make the service available from outside the cluster
PS C:\Users\User1> oc expose service/hello --port=8080
route.route.openshift.io/hello exposed
PS C:\Users\User1> oc get route hello
NAME    HOST/PORT                     PATH   SERVICES   PORT   TERMINATION   WILDCARD
hello   hello-demo.apps-crc.testing          hello      8080                 None
PS C:\Users\User1> # call the application (use curl.exe, curl in PowerShell is an alias of Invoke-WebRequest)
PS C:\Users\User1> curl.exe http://hello-demo.apps-crc.testing
Hello OpenShift!
PS C:\Users\User1>
The response “Hello OpenShift!” shows that the deployment, the service, the route and the name resolution are working. Finally we remove the test project:
oc delete project demo
Sample Output (click to expand):
PS C:\Users\User1> oc delete project demo
project.project.openshift.io "demo" deleted
PS C:\Users\User1>
Stopping and Starting the Cluster
The cluster does not need to run all the time. The following commands stop and start the OpenShift VM. All deployed applications remain in place.
# stop the cluster
crc stop
# start the cluster again (much faster than the first start)
crc start
After a longer break the first start may take a few minutes longer, because the cluster has to renew its internal certificates.
Removing OpenShift Local
To delete the cluster and remove everything that crc setup has configured we run:
# delete the OpenShift VM including all data
crc delete
# undo the changes of crc setup
crc cleanup
Then OpenShift Local can be uninstalled in Settings => Apps => Installed apps. If Hyper-V is not needed any more (e.g. because only VirtualBox is used), it can be disabled in an elevated PowerShell window, followed by a reboot:
Disable-WindowsOptionalFeature -Online -FeatureName Microsoft-Hyper-V-AllTroubleshooting
- crc start fails with a memory error: free some memory or lower the value of crc config set memory (minimum 10752 MiB)
- Error messages regarding the crc-users group: log off and log on again (or reboot) after running crc setup
- More details about a failing start can be shown with: crc start –log-level debug
- Name resolution of *.crc.testing does not work: check that the entries for api.crc.testing and console-openshift-console.apps-crc.testing exist in C:\Windows\System32\drivers\etc\hosts
- If nothing helps: crc delete followed by crc start recreates the cluster from scratch
References
- OpenShift Local (CRC) documentation
- Download OpenShift Local and the pull secret
- OpenShift Local releases on GitHub
Have fun 🙂
Leave a Reply